Ref. 895 Mixed media.-A different type of drawing just for relax
Made with markers, pencil and watercolor in a loose way
Kawasaki KZ-10 H2
Ref 892; The lighthing
Ref 894; Watercolor.- Bruise
Bruising involves using a hard tool to make indentations in the paper. When you apply a wash, the paint gathers in the indentations, creating lines or marks that area darker than the surrounding wash. These indentations can be made before paint is applied, while the paint is still wet, and after one wash has dried but before a second wash is added.
Variation: Paint a wash over a previously dried area. While the paint is still very wet, bruise the area with a stylus. Paint will fall into the bruised area. Then blot up the entire area. All of the paint will be removed except for the paint that has fallen into the grooves created by the stylus
Ideas like rivers, never have just one source
Ref 893; Watercolor---Adding Gum Arabic to your water
Adding Gum Arabic to your water color has three effects: it slows down the drying time of the paint, giving you slightly longer to work on creating your image or working wet into wet; it adds further transparency to your water colors and it increases gloss. Gum Arabic washes will have greater depth and appear more luminous than color washes alone. Gum Arabic is usually mixed into the water color wash but can be added to the jar of water if you prefer to use it throughout the painting. Gum Arabic should not be used directly from the bottle because thick films will be brittle
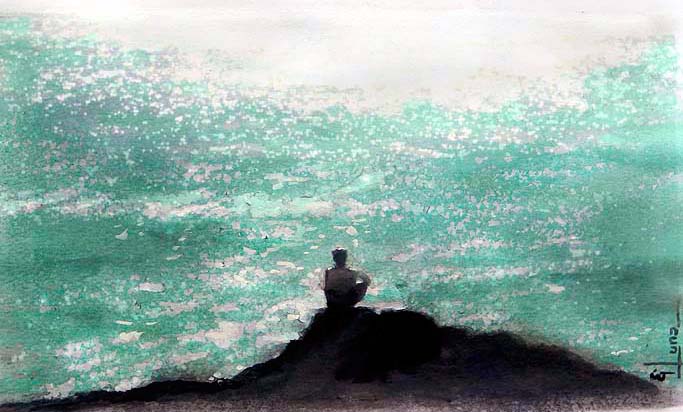
Ref 890 Watercolor.- BLOT
Blot wet paint with a sponge, paper towel, facial tissue, terry cloth towel, your finger or the palm of your hand. The towel or tissue can be dry or wet, flat, crumpled, or twisted. If you blot several areas, be sure to frequently re-crumpled the paper to avoid repeating the same pattern and to avoid placing the lifted paint back onto the paper. Blot lightly to remove a little paint; press hard to remove more paint. Blot straight down or roll the absorbent paper across the paint. Blot with a tissue wrapped around the end of a spool of thread, creating a light, round shape in the wet paint. Blot with tissue wrapped around the end of your finger, In my following painting I was able to make mist and light with this technic;
To reinforce White tone I employ White gouache .-White paint onto the white paper in areas where you want mist, fog or steam to be. When the gouache White is dry, paint the picture. When the completed painting has dried, dampen the paint where you want to blot out some color to give the impression of mist, fog or steam. Gently dab with a sponge or tissue paper. The color will lift easily where there is gouache White. This technique allows you to lift even staining pigments.
Ref 890
Ref 889; Color pencil & Markers; over hot press paper----
"Princess Dakar, Laía sanz"
Ref 888:_ Watercolor-- Masking/ Sponging/ Scratching
& Blending Exersize
Water scenes can be a challenge to paint in watercolor. But with a bit of practice and some careful study of the subject, you can whiz right through any such challenge. One thing that will be clear to a watercolor painter is the fact that the subject of the work is painted front to back.
Water is painted most often with a wide watercolor brush, filled with pigment and water. This liquid “soup,” when painted onto thoroughly wet paper, will yield a wash of rich tone upon which additional darks can be added or lights can be created by lifting off paint. Either way, the initial layer of “water” is painted as a general idea of the end result. Tones are added with various methods to build a unique and desired effect
Following painting was liquid masking in reflections with a fan brush and after dried sponging on; topically is another way to add bright light areas. By gently sponging on foam along the edge of a lake or seascape painting, you can create the look of froth that is very realistic. Sponging can also be used wet-on-wet to add speckles and multi-toned coloration to the sea or lake colors and also instead of wáter I use soapy wáter to make more additional color texture
Once it was dried I took away the masking fluid and added color again, on regards the horizont light main source then I start to scratching off the surface of the dry watercolor that will give me a sharp, severe contrast line. Scratch with a needle tool or the edge of a sharp blade drug horizontally across the paper. The blade will catch the fibers and lift them up, creating stark paper-colored áreas
Finally I complete the figure with Payne´s grey, to avoid a strong contrast some humidity still in the paper, allow me to blend the sharp color images representing some light vegetation contrasted shapes at the distance, within these cliffs
Ref 888.- Your Attitude + Your Choices = Your Future
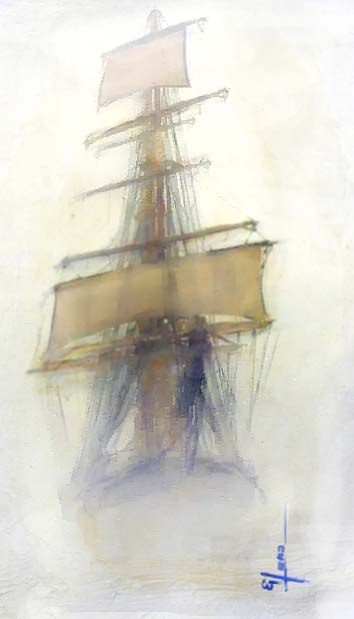
Ref 887 New watercolor Sándwich technic .- trough modeling paste layers
The following technique is under experimentation, and this is my first painting, which I discovered by a wonderful mistake
I was wondering how to make the shrouds the foremast and main moorings in a fade away through a misty environment,
I decided to work over hot press paper, which was the initial mistake, because it can not absorb so much soaking; however I continue working without so much thinking about it; therefore I start by painting the first fine lines with pencil which were to dark for my purpose, I tried to lift it out with wáter and this paper didn´t help, that is when I thought in modeling paste, which is a Little bit transparent if the thickness is quite small, so I applied the layer with an spatula.- after dry completely the result was better tan expected and I continued painting above this first layer but now with watercolor,.- I painted basically the foresky sail and the forelower sail and some yards of the different mast with a blend of ochre and orange, also I applied previously some yellow color for the sky in the background and into the sails at this time again I reinforced some lines with a dark pencil , the result was to heavy in color for my purpose so instead to lift the paint again, considering this type of paper I rather apply again another "modeling paste" layer above but now in a selective way trying to represent the mist I was looking for, finally after dry completely I put my signature in which you can see the difference in color below and above the last modeling paste layer
In other words at this technique I named sándwich because of that
1st pencil
2nd modeling paste layer (applied with spatula)
3rd watercolor and fine pencil reinforcement
4th modeling paste selective layer (adding wáter as needed)
5th final touch and details
Ref 887