domingo, 26 de marzo de 2017

Ref 1156/1157.- Watercolor // Using Blooming -- Through Watercolor

A good way to bleed colours into one another is through "blooming". Take a good amount of water to pigment in your brush and apply it to the paper. When the stroke is still wet, add in another colour with similar amount of water. You can manipulate the colours to where they need to be at this point. Allow this to dry and you'll notice that there are subtle gradients throughout the application

This is a try out of technique with the following result:
(Main steps are indicated below)


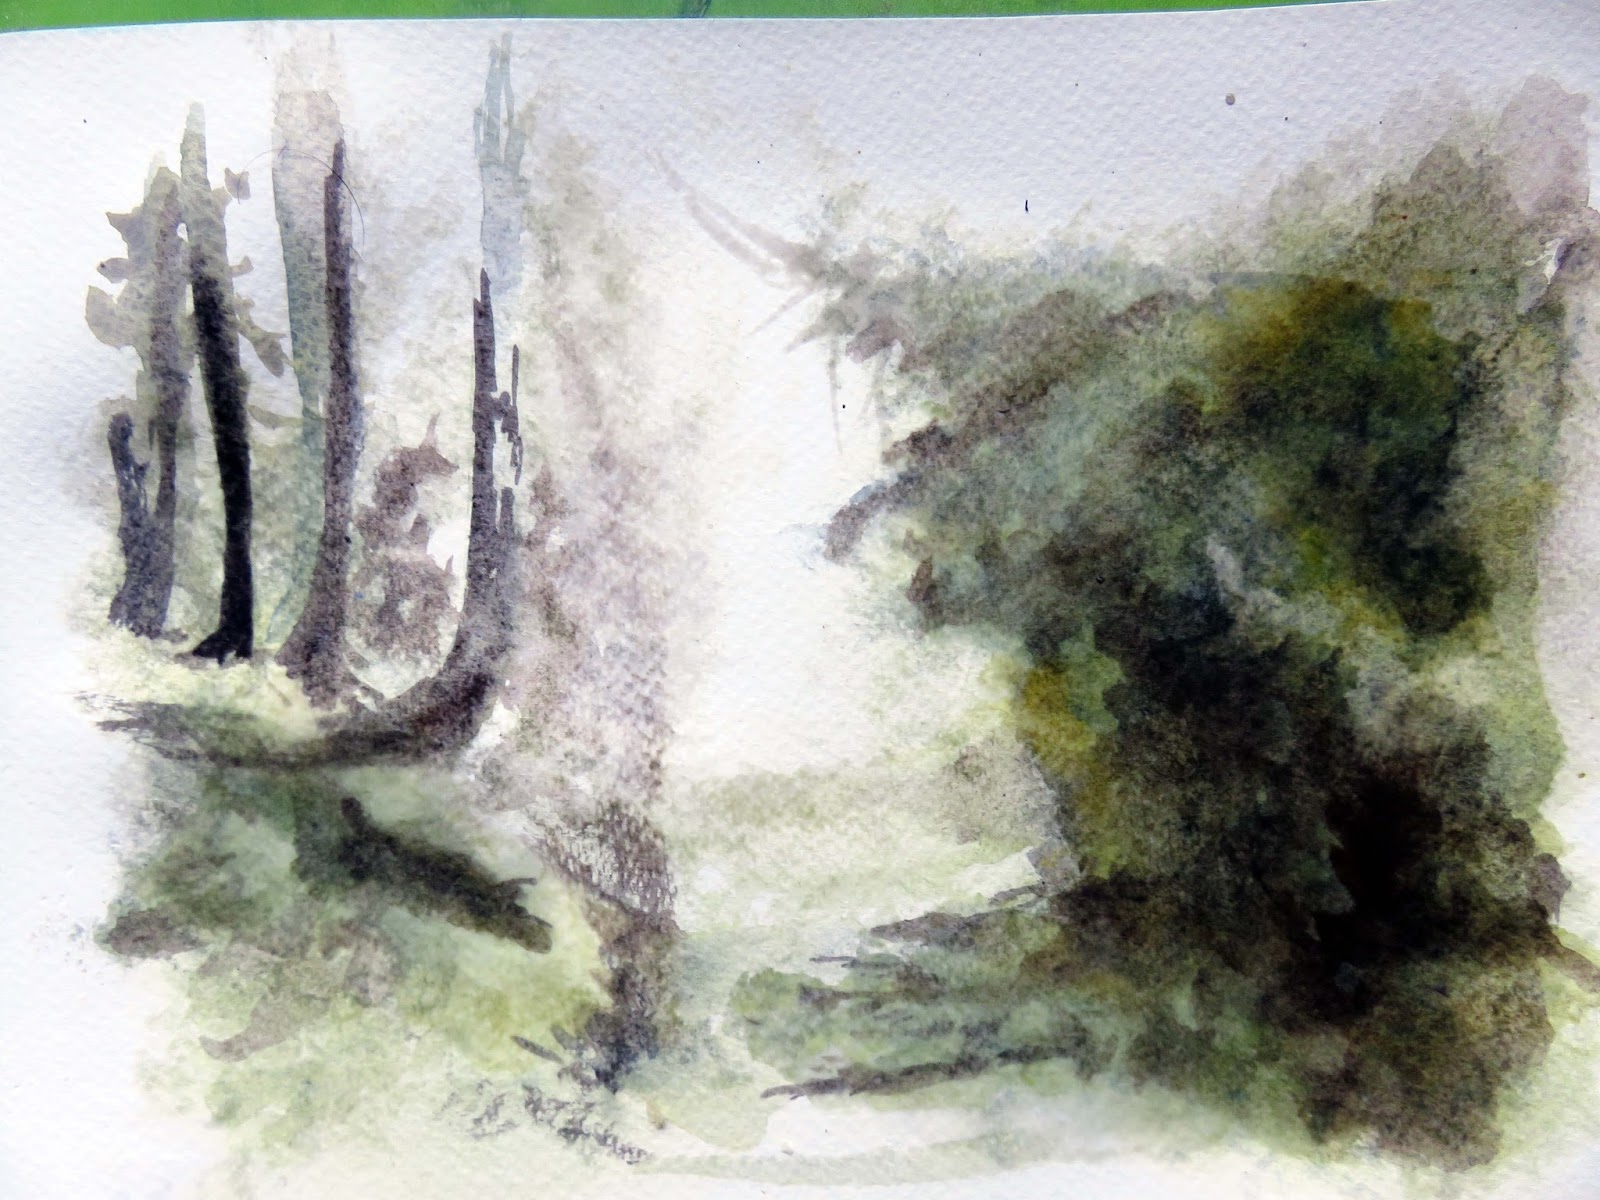
Step 1 "Note.As this is  one of my first try-outs with this technique, "I still have to make more improvements " -, -- (Watercolour is about planning. Think about where you'd like your whites and lights before you apply paint. It's vital to keep control of your brush as you paint in the edge of where you'd like your negative space to begin)
1.1.- So I sketched directly with a round brush with a yelowish tone above the still dry paper, letting it dry throughly before next steps
1.2.- with a wet sponge I damped the paper where I wanted to add the violet color (with a big round brush) as background
Where the paper is not wet, the color won´t spread
Note.- paper is Fabriano 140 lbs


 Step 2.- Now I start to apply the blooming application, (Rose Madder color), in order to do that, in order do not disturb the still wet color below with a brush (violet), I´m using a small spryer (see next photograph)   watercolour is a thin medium, you'll need to build up colour gradually. This is another advantage to the medium as you can do some color mixing right on the paper. Take one colour and lay it down. Allow it to dry and then revisit with another shade. You'll notice where they overlap, the pigment mixes and you're left with a different color


One very important tool to have in your tool kit when working with watercolours is a paper towel. The paper towel almost acts as a kneaded eraser for your watercolours. Laying down a wash of colour and then lifting parts of it up is a great way to add layers of detail gradually. Paper towels are also very useful for correcting mistakes or directing the paint in different direction

 
Another way to cause watercolor blooms is to put a very wet wash of color across your painting surface. Tilt the surface slightly or even more drastically. Allow this wash to dry. Notice that the color has drifted to the bottom of the page, and when it had nowhere else to go, it started floating upward again….thereby causing another type of Bloom.
if you allow your wet paper to lose its shine, the addition of more color will not cause a bloom
 As I apply more color, I'm careful to keep adding water so the colours blend and stay soft. It can be easy to overwork and produce a muddy look, so less is more.
Sometimes you'll need to "erase" your watercolour. While you can't return the paper to 100% white, you can lift away colour to correct a mistake or adjust the lighting in a piece. Work with an already dry swatch of watercolour and using clear water, paint in the shape you'd like to lift out. Let it set for a just a minute then dab away the water with a paper towel. You'll see the colour lift out in the shape you painted in
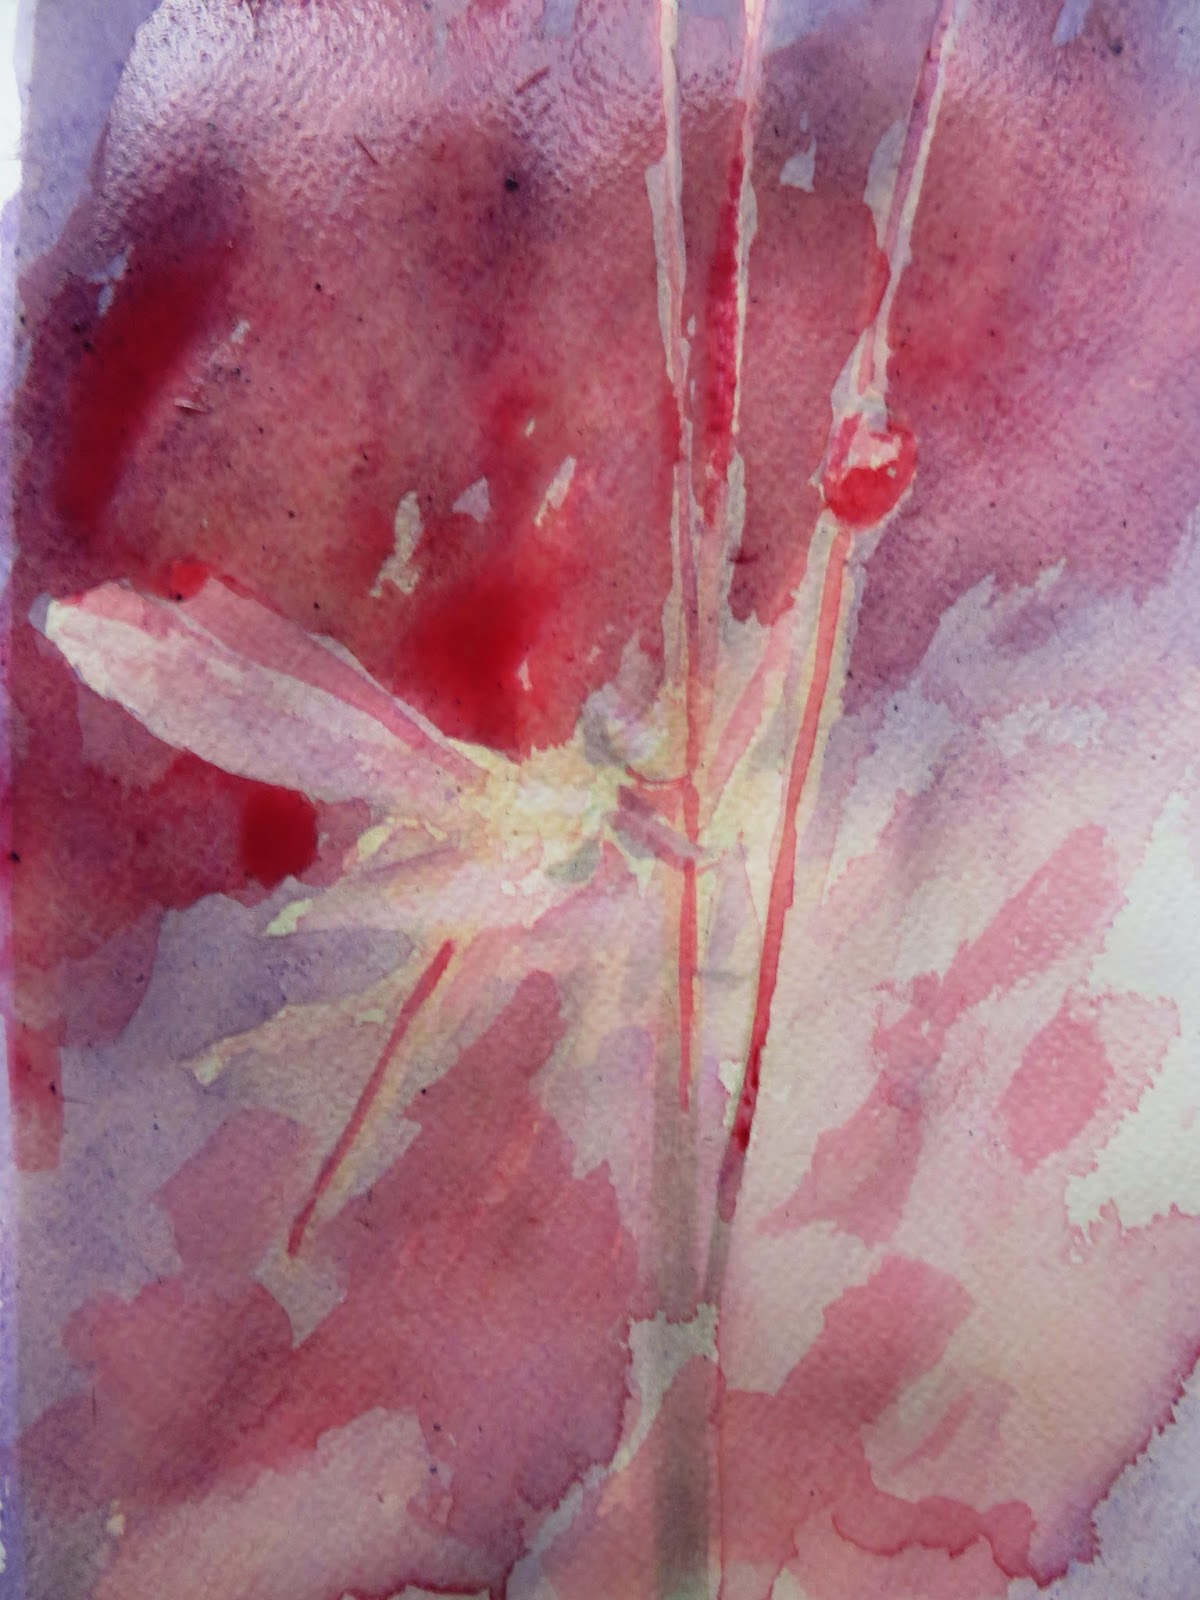
 Using my paper towel, I begin to lay in colour and take it away to get a more layered look to my piece. I am careful to let areas dry before I apply more color but now with a big round brush and lot of red pigment on it. This allows me to move around the whole study. I'm also paying more attention to what colour goes where. – light to dark, wet and dry, as well as colour pulling – to achieve the look I'm wanting. for details I´m using orange and dark blue

 
                                           "Strolling And Living Their Own Fantasy Tale"


Bonus Painting
Same technic but colors are more different between them therefore additional contrast (complementary colors Works pretty good for shadowing) 
 
"Searching in the Dark Woods"
 
 
Ref 1157
Please wait; wait; WAIT !


sábado, 25 de marzo de 2017

Ref 1155 Watercolor exercise

Friendship with a Taste for Art;

Ref 1154.-  Mixed media try out //- Color Pencil + Gouache, Over Stardream Colored Paper

                           "Reasons to go out of bead - None"


Main Graphical Steps

As this is a try out, I really do not have a conceived plan in advance, so I´m going to take advantage of color pencils as much as posible through out this process

The paper is Stardream 105 Lbs in color blue as you can see to work the background on it
I start by sketching with 2 color pencils on it


By past experiences the gouche Works and cover this type of paper quite easily so I work  indistinctly, with both médium to get what I need


Undergoing processing


Final details basically with color pencils to define and highligth

sábado, 18 de marzo de 2017

Ref 1153 Watercolor - theme contest --"In the dark Woods" (creative exercise)


"Imagination, creates reality in the dark Woods"

Ref 1150/1151.- Watercolor // Partial and total modeling paste within the watercolor painting


2 exercises regarding modeling paste addition
1st case just adding in the top of the tres illuminated by the moon as final touch
(modeling paste mixed with deep yellow watercolor)


2nd Case mixing with cerulean blue to paint directly above the paper
 --- (Stardream blue color paper 105 lbs)


Ref 1149.- Watercolor // Texturizing wet over a mix wet of < "60%alcohol,40% wáter" damping surface >


Alcohol and water don’t mix, so it creates a neat effect when you add some rubbing alcohol to your painting. I’ve found to get this effect to work well, you need to really make your paper wet! Also, try to use a higher concentrate of alcohol (ie: 60% as opposed to 50 or 40%) through out semi-final steps
This is the result to apply this technique within the following painting;


Step 1.- The first background step it was  by painting with my water colors, over just wáter "wet on wet" to sketch the main reference idea; ---(as I planning in advance I added some masking fluid for the grass and rocks previously)


2nd Step.- Let id dry troughly and then according with this procedure I change my wáter pool from wáter to a mix of alcohol-wáter (70%-30%) to damp the paper in a partial way with the help of a plastic sponge.- add then darker watercolor tones over the brushes áreas
TIP:_  Have some old tissue paper lying around?-- Scrunch it up and after painting a piece of paper with some bright and deep colors, making sure your paper is nice and wet (same blend) , press down on it gently with the crumpled up tissue paper. You’ll get a great texture  this way.


2-3.- Step --The previous wash must be only sligthly damp, in order to achieve soft edges without the colors flowing into each other so wait until the sheen has diminished, and then in semi dry condition with the help of an spatula or plastic card make some scratchs to suggest highlighted branches


4th Step.- Now I apply the brigthest greens (try to mix your different greens thru, blue with yellow preferably) keep adding scratchs to créate more interesting shapes and definitions into the brushes

 
Note.- the "alcohol/wáter mix" once it dries opaque vibrant tones. but separates and/or break  the different colors interestingly.- so take this in account making previous testings over scratch paper

 
5th Step.- Definition and final touchs with fine brushes to créate and suggest particular branches, you can use either the alchol/wáter pool  or wáter pool depending  if your defining rocks (soft focus) or branches (more in focus lines)  integration into the painting and also take away the masking fluid of it as required

miércoles, 15 de marzo de 2017

Ref 1152.- Watercolor // Modeling paste as watercolor painting body

Molding Paste can also be used to create foundations for painting either to create texture over a smoother surface, or to smooth out a textured surface. The absorbent qualities of Molding Paste make it suitable as a ground for nearly every painting and drawing media.

Ligth Molding Paste it is excellent for building surfaces and creating textures. Dries to a hard, yet flexible, opaque film. Blends with colors to tint  .- you can paint over it and/or blend with colors

This is the result to apply this technic over Stardream colored paper 105Lbs.
(you can use any hard weigth paper )
Ref. 3D idea found in the web

 
visual steps;
 
.The color of this paper is denominated by Stardream paper brand as  quartz
1st Step.- I masking a frame into the paper to work with; with a hard surface beneath 
I added a layer of ligth molding paste with 4 watercolor blendings in accordance with:
 A.- For the sand I use ochre+flesh applied with spatula as it become dry I wet my fingers to smooth the surface adding just wáter above it near to the ocean foam I added orange
B.- For the ocean I did use a dab of viridian + cerulean blue also with spatula but no need to smooth the surface as in the sand área but add radially to follow a wáter ocean flow
C.- For the waves just raw modeling paste
Note; The waves at this moment are not necessary to be so big


Now I mixed brilliant pure watercolor with modeling paste to be added into the dry previous painting in accordance the different subjets.- within the painting idea


Now you can increase the size of the foam waves (when the idea is more clear base in the subjects on it)


lunes, 6 de marzo de 2017

miércoles, 1 de marzo de 2017

Ref 1147 //--- Watercolor exercise

"Sculpture is a three-dimensional object with a message... Painting is an object with a three-dimensional message"

Ref 1146.- Watercolor & Modeling paste over Stardream colored paper


This is the result of this particular process (see graphical steps below)


1st Step.- With black watercolor and a round brush I delineate the flame contourn and matches body


2nd Step.- Modeling paste application into the flame contourn completed with a small spatula, is also easy to blend watercolor with modeling paste to work by layers as they dry


Ongoing activities


watercoloring


Additional modeling paste


"Love is a fire that burns, but is never seen"