viernes, 29 de abril de 2016

Ref 1022.- Watercolor // Watercolor over opal Stardream color paper
                                      105 lb

The following painting is try out to take advantage of the paper color undernith
some whites also were reinforced with permanent White (gouache) but this time quite a Little bit


                             "Horseshoe Niagara Falls"  photograph reference

jueves, 28 de abril de 2016

Ref 1021; Watercolor // Brusing Technique to mark and paint lines

Metallic and/or plastic hard blunt edges and/or knives of all sorts are Handy in creating a variety of textural effects and Works well to lift or push pigment creating a number of incised effects by BRUSING the paper fibers with the tool.
I´ve roughly pulled the tip of a rounded tip through my wet dark (shadows) wash here with a pressure great enough to push the paint in the middle of the stroke out of the way while bruising a darker área along the sides.-
This is the result to apply this particular process
Over cold press paper 220 gr


In order for you to see how this technic Works; I look for a paint with dark zones and lines, where can be handly
1st step I did a detailed pencil work for my reference purposes


2nd Step;.- Detailed pencil it was basically do it;  to understand where I need to apply the masking fluid, because the watercolor painting will be applied as dropping color as my main purpose in order to integrate fading effects within the shadow´s área


3rd Step;.- I prepared watercolor pools which I dropped into the painting from the darker áreas to the light ones tilting the drawing accordingly .- previously I wet those áreas with a sponge guiding the color paint as much as possible in a loose way

4th Step;.- The bruise technic is applied rigth here, (before paint dries) all the lines were made with the tip of a rounded tool, the pigment paint follows the stroke and now you have darker color where you needed most as a guide and as final touchs


5th Step;.- Once you´re satisfy with lines, you can start to rubbing it off all the masking applied before NOW you have the underpainting in which to work with


6th Step.- Add watercolor as required, (Note It is better to work with watercolor details right after step 4th and take away the masking fluid at the end I did it before to show you the effect of bruise so you be able to see the whole contrasts at current photograph step 5th
As I did I have to take care to add watercolor and I had to reinforce some whites , nevertheless this technic works pretty good mainly in coarse paper

domingo, 24 de abril de 2016

Ref 1018.- Watercolor // Playing with whites hues

This is the final result of this process;

 
I save some paper whites and base wet on wet I added first colors without any particular definition
Regarding the intial dark shadows I did with a misaligned brush in a semi-soak condition
 
 
A paper dry I start to add more color and definition but now with a tissue I´m lifting out some background color and adding also watercolor ehite for middle background distance
 
 
Once dry I complete darks definition,
Then with a wáter bottle sprayer once again  at the foreground I start to add permanent White here and there integating with a tissue so some shadows are still visible under White reflections finally blue and yellow pure colors to give additional color impact and watercolor White to reduce another ones


sábado, 23 de abril de 2016

Ref 1019.- Watercolor // Watercolor pencil; as underpainting

This is the final result of this process:


Step 1.- Unless you use very thin paper no stretching is required
Material needed; watercolor pencil; basically violet & black and a wear brush for rubbing
over cold press paper 220 gr
The main shapes are sketched with these pencils, negative painting (basically the background of the figure)with fine scratched marks to conform later on a heavy shading close to the figure is black and then violet to produce the blending effect, which finally be rubbed with the hard brush
                          

Step 2.- Dense layering of black and violet additional pencil lines to be satisfied saving some White paper accordingly


Step 3.- With a fine brush first and then with a bigger I added wáter over the dry main áreas and lines, always I´ve got an absorbent tissue to integrate and fade color over the paper (this will be my underpainting)

 
Step 4.- Let it dry so you can add more color deep with watercolor and a brush,
In the hair you need to do the lines base in the flow and right after start to lift the paint with the contrary side of your brush "the tip", ---- to add more light reflection once is completely dry I scratched some additional lines with a knife in a gentle way


Step 5,.- Final touchs; the face has been made with a fine brush and a little bit of some additional skin colors and again once completely dry I layering again with a violet color and a tissue of paper to integrate additional color accordingly, without touch the White paper zones which are working pretty good so far,
nevertheless I added some permanent White (gouache) to give additional shining brights over the right side (light source)


jueves, 14 de abril de 2016

Ref 1016/1017 Gouache // Gouache over a metallized color paper

This is the final result of this process:


Continuing with experimentation; now I tried a metallized paper of same Brand "Stardream bronze finish", I start by stretching the paper in warm wáter with the idea to make it more suitable for wáter painting, and from there with a gel pen start to make the first main reference lines


The basic idea was to work just with watercolor, but the result is not was I expected.
the color is too dully

So I quit on watercoloring and I decide to use gouache to complete this Project;
You needs to work fast however the watercolor below help me to do that


After dry I gave the details to make me feel more satisfied


                "Unless you own a parrot, then silence is highly suspicius"


Ref 1017 another exercise:


miércoles, 13 de abril de 2016

Ref 1015; Watercolor // Working with a different type of paper

Most watercolorists stretch their paper before painting, also. The process makes the fibers of the paper expand, helping to avoid buckling and warping. It’s much more enjoyable to paint on a flat surface and be able to use as much water as you want. Also, it’s easier to paint a flat wash if the paper is stretched No matter what kind of painting suits your fancy the most, painting is an enriching and fun experience. With this medium, you never really know what the outcome will be, and it allows mistakes to become “good accidents.” You can achieve very unexpected paintings by letting the water and colors speak to you and guide you through the painting. But, in the case of watercolors, using the right (or wrong) type of watercolor paper can truly make or break a painting.
Now I´m working in a total different one brand´s name is Stardream,
In this ocassion I stretched the paper  in order basically to take away the surface glow and/or try to be more wáter aborbent and this is the result base on the following exercise.- so far worked better than previous references (see ref 1014 & 1013) where I have to combine with gouache, however in this particular case is just watercolor medium

Ref 1014.- Watercolor & Gouache // Different Approach of Mixed Combination

Gouache dries very quickly, both on the painting and on the palette.  However, it is rewettable, and remains active, so combined with watercolor you need to take some considerations; unless it is fixed in some way, wet paint – or a wet brush – stroked over it will activate the existing paint, and the existing paint can mix with the fresh paint that´s why in this particular Project I did use fixer
This is the result of this process:


Material needed;
Darck color "Stardream paper"
Transparent watercolor.-
Opaque watercolor.- (gouache); permanent White; lake blue; médium yellow
Fine and regular round brush & fan brush
Fixer; mate True Film

Step 1 Watercolor has been the main ingrdient to handfree-sketching over this dark colored paper in a pretty loose way


Step 2.- I start to add permanent White (gouache) mixed with watercolor to start forming shapes, basically within the flowers,


Once it is semi-shaped I fix and let it dry completely, this is basically the underpainting base


Step 3.- This part of the proces is to highlight main colors, so I use just basicaly gouache and or gouache mixed with watercolor and again once dry apply fixer in spray


Step 4 Final completation with watercolor (transparent properties) .- the bright lines and dots were made with watercolor trying do not re-actívate the lines underneath, that´s way the fixer so extra care is needed with not so much wáter on it, dots were made with a fan brush load of paint then run a finger over it to reléase the paint, spatter from one point to give a pivotal direction to the plume
Note.- real color of this paper base. can be seen upper side right, without touch

lunes, 11 de abril de 2016

Ref 1013.- Watercolor & Gouache // Mixed combination

Gouache is the opaque versión of watercolor, is sometimes used on its own for small highlights , but it can also be mixed with watercolor to make a semi-opaque paint, that retains much of translucency of pure watercolor but does not have the chalky quality typical of gouche itself. I have to do it cause the paper I use it is silver colored and is not so much absorbent

This is the result of this process


As this is my first time with this cardboard paper I´m making some previous tests mixing on the paper, a lively mixture can be created by letting the colors blend on the paper surface, rather tan mixing them in the palette, although they do not mix so throughly each color retains its identity.
However by the result I could see the lack of covering power or lack of pigmentation


1st step; Base on previous results I decided to mix watercolor with gouache so let´s work on the underpainting first so as I thinking to do White flowers I´ll need to contrast it, the source light comes from left side so my watercolors are the transparent ones and in the dark I´ll apply darkers colors mixed with gouache to créate a semi-opaque base - to do that; I´m mixing with it´s gouache same or similar color counterpart, the violet and blue hues to make the darkest color I mixed ultramarine blue with Brown (for all background I´m looking fro transparency so it is more watercolor than gouache 2:1aprox)


2nd step .- Now it comes the tricky part to highlight White watercolor, the flower base is more White watercolor than White gouache, so I apply it, in a random but harmonized way
Note in this photograph  you can see a dotted background condition, this was posible spraying wáter over the paint (just a Little bit and let it dry completely, basically over dark zones to créate a transparent atmosphere touch)


3rd Step.- .- To ceate a more misty effect I added more watercolor White and spray wáter again and I lift some painting with an absorbent tissue
 
 
4rt Step.- I reinforce with some additional colors (watercolors) part of the background as a glazing
While White color (White watercolor to White guache 1:1)of the flower dries in a misty and/or faded way
 
 
5th Step.- Till now I´m working with round brush but next finish part will be with a mop brush, because now I´ll be painting just with White gouache to conform each of the flowers  with more highlight color and definition


6st Step.- with a fine brush I define some branches
 
 
7th Step.- I complete some additional contrasts here and there until be satisfied


domingo, 10 de abril de 2016

Ref 1012.- Gouache // Gouache over silver cardboard defined with gel-ink pen (wáter-base)

This is my first try-out; with this new ongoing technic
As soon as I develop the best methodhology to work with I´ll write down some useful tips
 Reference;  Deviantart illustration


Ref 1011.- watercolor // Tissue Handprint

Interesting textures can be made by pressing your hand into the damp paint. Experiment with different parts of your bare hand, however this painting (just the girl) it was made basically with my thumb, given a dotting texture, I didn´t but you can use Impress with fibrous materials: cheesecloth, gauze, netting, open-weave fabrics, string, thread, grasses, moss, nylon stockings.
Impress with various kinds of paper or plastic. The sheet of paper or plastic can cover the entire painting or a small area. Each type can be applied flat, crumbled, crinkled, stretched, accordian-pleated, twisted, folded, or cut into irregular shapes


Ref; photograph


                "Drawing my self-portrait"

jueves, 7 de abril de 2016

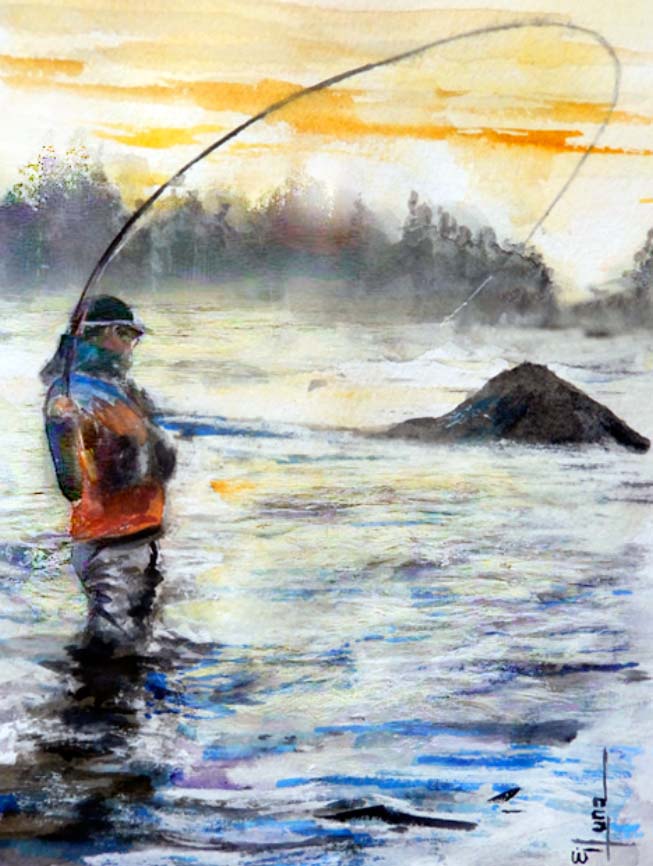
Ref 1010; Gel Ink pen & Watercolor // Detail build up with ink

The reference has been taken from a similar painting which I´ll be reproducing but now in watercolor, over cold press paper.- This is my second exercise with gel ink pen (wáter base) to integrate throught out watercolor


Material needed; 3  gel ink pens;   brown; blue & black
                                        watercolor;      indigo blue; turquoise;
                                                               cad yellow médium;
                                                                ochre; cerulean blue
                                         Gouache:        permanent White
                                          Brushes;        Round fine & médium
                                         Graphite transfer paper .- just for main references
                                         Absorbent Tissues
 
Stage 1.- Transfer of main lines to work with  
 
Stage 2;  This was my first try with graphite paper, .--I did too much pressure and I had to erase some zones, leaving just the main reference lines on it .-then I start to define those lines with brown ink, and even with your finger touch you can difuminate a bit the color over the paper to start working in shadowing, I did the same for the sea with my blue ink pen  
 
 
Stage 3.- Once this definition is about 60% complete, I start to work with watercolor, mixing ochre and cad med yellow for shadowing on the ship´s sails, and raising paint with paper to integrate, accordigly, once dry I reinforce some additional darks with black ink


Stage 4.- Now I start to work with the sea and sky background with pale colors
 
 
Stage 5. Complete definition.- ropes and moorings highligthing with ink / watercolor and additional shine with permanent White either at the sails and/or the sea foam 
 
 “Traveling tends to magnify all human emotions.”
 

viernes, 1 de abril de 2016

Ref 1009.- Ink and watercolor // Getting watercolor granulation to enhance glass appearance

Final result for this process


My reference it was a photograph which I changed a bit for my comparisson crystal purposes

I copied keeping the lines fairly loose and free (this is my first intent with this type of "colored gel ink - just silver and black colors" in a light pencil drwg as my guide over 190 gr cold press paper


Before start to work with ink lines, I gave a watercolor  wash  in a wet on wet condition
then I start yo use silver and/or dark ink in a damp condition which Works to add additional line´s texture and shadowing

 
The following step is the important one, to add granulation, because some pigments tend to precipitate or break up, when mixed with wáter, resulting in a grainy appearance, this can be disturbing if you are trying to lay a perfect flat wash, I just put the paper with tap wáter the rsult granular quality adds extra interest


Finall I start to define lines , as this is my first intent like I said the large bottle left side was made a Little be different from the larger at the right side, the granular effect looks more in the left side more alike to cristal and to complete the painting to add 3D appearance I added permanent White "gouache" into the reflections center of all bottles, cleaning up also the reflections
Note like I said it was a test and I didn´t take care and many pinture are outside its borders