miércoles, 16 de marzo de 2016

Ref. 1004.- Watercolor // Working with modeling paste over canvas

I use to work this process with acrylic, but now I´m trying instead to use watercolor, The final result due paint transparency had to be reinforced, so did not work at all, I´m posting the different steps just for reference, but I´ll try a different approach next time

The Rooster Final result;


Graphical steps:


Lesson learnt
With acrylic painting the next step would be the last one, but with watercolor, I had to repeat color definition several times so this process didn´t work as I expected -  the result it is not clean


lunes, 14 de marzo de 2016

Ref 1003.- Watercolor // Variegated washes
A graded wash is one that becomes lighter as it progress down the paper, while a variegated one contains more than one color ideal for sunset effects and also for the background of this storm

This is the result of this process: ( Ref Carl G. Evers original painting)


Stage 1 Materials; round brushes several sizes
           color .- (watercolors) chrome yellow; ochre, ultramarine, Payne´s grey,
                       Viridian, burnt sienna ; phtalo Green
                      (gouache) permanent White
                               paper 190 gr
The sketch it was made with pencil just to indicate main forms location

 
Stage 2.- you need to work fast with variegated washes, so its important to mix the colors in advance, lay the colors in even or random band, depending in the effect you want to acchieve, and do not try to work back onto the paint while is drying
Background.- From top to bottom yellow chrome; ultramarine blue, some alizarim and finally viridiam I lifted paint near to the ocean with a wet tissue to represent foam waves
Tip as it dry the best way to add paint (if needed is from the sides toward the center tilting the paper accordingly)
 
 
Stage 3.-  I didn´t add so much pigment into the background because I want to represent windy and rainy effect, Then I start deciding the palm refference at the frontground with payne´s grey


Stage 4.- Add colors in a loose but happy way (no remorse) feel the scene


Stage 5.- Negative painting into the ocean.- Begin to paint the sea, starting at the horizon (the atmosphere and see are viridan so with more viridian you start to define the horizon )working gradually forward, great care take to reserve the highlights the tip of the brush is used to make calligraphic marks (tip-- be sure the first layer of paint is dry before next is applied)


Stage 6 Highligths and shadows .- final contrast.- Directional brushstrokes are key element, to provide color contrast include some color branches,feeding into the foliage masses and add dark accents, dry paint spread a Little into the sky at the edge of clumps to suggest feathery texture
I had to apply permanent White  again into the oscean waves to suggest foam formation and spray wáter and use tissue until be satisfied with bottom right side, finally with a great movement of my forearm and with a fine brush I did some lines into dark spots to suggest rain into the wind

                          "Even in the midst of the storm, the sun is still shining"


sábado, 12 de marzo de 2016

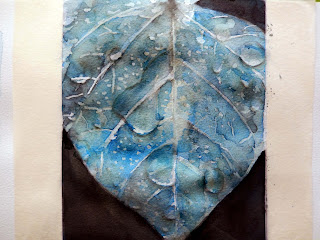
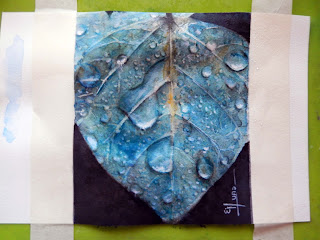
Ref 1002.- // Watercolor; How to make raindrops

This is the final result of this process;   (ref. photograph)


Stage 1 Preparation;
Cold press paper 190 gr
Watercolor.- Turquoise; Ivory Black; Ochre; White; Vandyke Brown
Gouache.- Permanent White
Brushes No 1,2,6,7 round sable
old bristle brush for lifting paint
Other materials.- clutch pencil B; Tissues; Kitchen roll, Brown Gummed tape
                          Masking fluid

Stage 2.-  Composition;
Pencil guidance,


Stage 3.-  First wash & masking 
As I want my leaf to pop up from the paper I decided a dark background
I used same color of the leaf (turquoise -  but mixed with ivory black )
I did not worry to much about even coverage, this is the first of several washes
Note it is better to use neutral tint mixed with turquoise, because results shown better transparencies into the dark background


Stage 4.- Second wash
After first has been dried I painted another wet wash of same mix and in the leave continue adding masking after some pale color added to avoid whites too bright at the end (Tip. into the small drops the masking is the trick, I added with a toothpick traying to gain high in some way against the paper surface)


Stage 5.- I starting lying down washes on the leaves, using predominantly turquoise and being careful to leave áreas of White paper for highlights to shine through, then I applied the final background wash, increasing the amount of pigment, (Tip I use gravity for paint my leave, in order color goes downwards the masking Works as a barrier for this painting wash going around the small dots)


Stage 6 Wait for dry and turn around 180 degrees and again pour color paint but now more concentrated because the color needs to have a gradient of intensity base for the dew drops, The masking is doing its job as color protection but also as barriers to define small dew drops at the end
I repeated this process twice until be satisfied with colors


Stage 7 Dewdrops and veins.- loosening áreas with a wet brush and lifting the color with tissues, I began to depict drops and veins (main veins are still masked) I added some dark color for shadows of big drops blending with wáter into the lighter áreas, and a darker mix underneath the dewdrops


Additional tip,.- Just after add color paint if you add with care a drop of alcohol the effect for the bid drops looks in some way more natural and integrated and do not forget to tilt the paper accordingly so the gravity also Works for you


Stage 8 highlights at first I use transparent White, but the real whites needs to be with gouache "permanent White" as you advance to reinforce it, I did by working each section of the leaf until be satisfied,

 
Stage 9 Final touchs.- you need to work in each of those drops so I took away the masking but I left some of them, if the appearance looks well and again hihlight first the selective required shadows with same turquoise color and again with just White (gouache) highlight accordingly
 

Stage 10 Once the painting was completed I increase the intensity of some shadows with additional glazes ochre and turquoise and with some tissues at hand


jueves, 10 de marzo de 2016

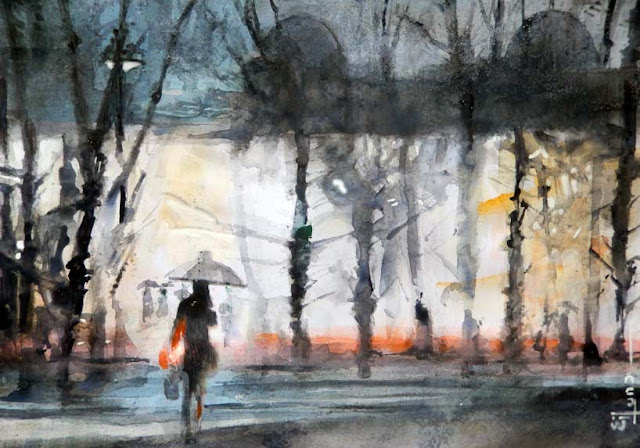
Ref 1000.- Watercolor // Nocturnal Scene

Final result for this process (over hot press paper):


Sequence;
 

 Use of diluted graphite applied with sponge brush (I masked just some Little áreas )

                   Wait for particles to settle and keep adding main features for shadows

 
Wait for particles to settle and then wáter spray to just left the impregnated color on paper
then again wait till completely dry
 
 
Apply loose watercolor to integrate main idea
 
 
As this is hot press paper you need to wait for dry several times to avoid wrinkles
then apply True Film fixer over it and again wait for dry (now you have the underpainting to start applying watercolor glazes and painting feature definitions)

 
Trying to add some additional texture into the dark área I trow a Little salt while painting was wet
 
Final free and loosy details to complement
 
"Enjoying an evening shopping"
 
 
Bonus:
Ref 1038.- Another nocturnal scene I did but now over cold press paper which I reinforced with watercolor markers


miércoles, 9 de marzo de 2016

Ref 1001.- Watercolor // watercolor powder to finish a painting

This is the final result, after complete this process: (ref photograph)


Main steps;.- For this Project I did use wáter-soluble graphitone from Derwent (6B dark wash) sketching main features as detailed as posible, over cold press paper,. the idea is to make shadows with a clear guidance lines to work with
 
 
Planing the painting in advance we can mask to reserve whites
 
 
After complete these stages we need to fix the graphite to the paper (now we have our underpainting)
now we start to apply watercolors over it, without disturb main tones undernith but be sure underpainting is completely dry <TIP.- it is easy to conform fine lines in watercolor, after apply the paint onto the paper and make those with a toothpick.- try it >


color is less intense when it dries, so after these stages I apply again the fixer and add another layer above, however the paint retains much of the translucency.- ideal for the butterfly wings for the darker zones I mix 1:1 White gouche and White watercolor to also reproduce  granular effects and make a kind of clear color but bright wash
 
Now the new technic; with a lime I make watercolor dust (powder) of a silver color pan and add above the painting after take away the masking to cover all the wings to do so , previously I sprayed wáter on the wings so the color will settle down on it
 
 
The appearance will be totally improved with this step
 
 
Lets wait for dry and make final touches -- basically highlights


sábado, 5 de marzo de 2016

Ref 999.- Watercolor .--- "Hello Spring"

This is the final result of this process:  (ref. similar painting)


After draw the composition (made in this case from a painting similar reference)
I applied a lot of masking fluid to reserve whites, basically with a fan brush .- washing the brush out a regular intervals to prevent the fluid from dryingout and clogging the hairs, I did use also a toothpick at the details foreground, and then I prepared pools of color for the initial wet on semiwet spot washes, leaving small áreas of drypaper for the upper sunlit side


Afer wait and allow the first washes to dry, then use the same colors again to reinforce them and continue to build up the painting

 
Remove the masking fluid and erase some of the pencil lines if any, glaze over the more distant object to make it recede into the distance, glaze over some highlights that appear to glaring, because too much pure White looks unnatural in a landscape


In the final stage all that is needed is a Little more detail and definition. painting in a small branches using a small brush


miércoles, 2 de marzo de 2016

Ref 998;- Watercolor.- Painting with soapy wáter (ref. photograph)

There are several different ways to paint with soap., So I´m going to take advantage of the soap in the following way for this particular painting as first stage:
A). - Spatter soap onto a wet wash. Where ever the soap lands, it will push the paint away.
 B). - Drop soapy water onto a wash and then paint across it with a brush. The soap will disperse the paint and stop it from flowing back into the área.
 C). - Mix the soap and paint so there are lots of bubbles. Paint with this bubbly mixture. When the bubbles pop, they create additional texture. (If you want to avoid the effect of bubbles, mix the soap gently or allow it to stand until all the bubbles have burst before you paint.

This is the result through out this process:


Main stages; With grey´s Payne in a loose way I start to indicate main features, ans also with Thalo blue where the shadows will be and then with pale red troley shape, The paper, it is still soaked with soapy wáter, this stage is then, wet on wet


As this paper gets dry, I reinforce main shapes still in a loose way


I´m adding also White color while paper gets dry, the effect with soap make painting lumps, making the rain effect more realistic


Into this stage I start to paint lines (because there are many buildings and Windows - urban scene), trying to fade them - paper need to be still soaked otherwise lines will difficult to integrate


Once completely dry - nest steps will be made "wet on dry" to start detailing and add additional color pigmentation from darker to light


Final stage. for additional brightess I use to work with opaque White (gouache) to highlight rainy drops, lights etc.

                                    "Travel is the only thing you buy and make you richer"