martes, 31 de mayo de 2016

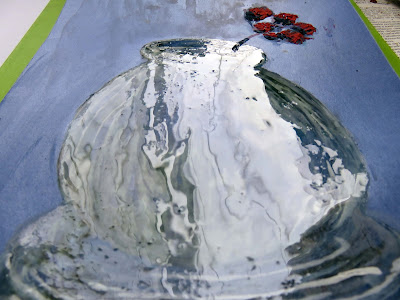
Ref 1041.- Gouache // Gouache & watercolor "varnish" over Stardream sapphire color paper

This is a selective variation, to represent crystal likeness, making the paint to shine in some additional way and this is the result to follow this process

 
I´m continuing with this paper, so for this purpose I chose Stardream Zapphire color paper in which my first lines, are made with permanent White "gouache" all those lines are done with a fine brush, takes time but results are better 


Completing with some flowers on it made with watercolor
 
 
So far the result has been Ok if you want to use just paint, but I want to go a Little bit far therefore my next layer is done with modeling paste mixed with prussian blue, and mixed with brigth red to apply as a sándwich over the glass so some lights will come from below at the end


Again with a fine brush I trow out and reinforce White lines and I start to define some drarker lines with just prussian watercolor to make transparencies on it


Once everything dried I sectively cover the whole base with brigth varnish with a soft big brush


Add more brigth color in the  flowers  and more additional whites over the varnish wich will break in a random way making the glass appearance more convincent, if you add more wáter with the paint the White becomes more transparent over the varnish making it opaque in some way 


The sándwich layering start to work with different tones over it
Next i define again some darker lines and whites base in a light sourcing 
 

Another selective layer of varnish to cover just the opaque zones  
 
 
Wait to dry and complete with more White lines to add additional reflections on the base


sábado, 28 de mayo de 2016

Ref 1040; Watercolor & Modeling Paste Applied with Spatula

The modeling paste is like marble dust like clay or putty, the paste is withish or colorless, so you can add color to it, to produce any hue you need
So taking advantage of that property the following Project its a good example of its utilization because you need to mix your tuve colors with modeling paste, and you´ll find yourself with a lot of painting on your palette and this sort of paint will need big, thick brushes and painting knives in order to develop a richly texture either under or to complete a painting
As this is one of my first attempt with an already colored paper like Stardream "old gold" color 105 Lb, do not overdo the amount of modeling paste to avoid cracks when it dries eventually 

This is the result of this particular process;


1st Step.- I chose this color paper to combine with "in a gold sunshine colors" combination as underbase, then I start to add translucent watercolor to take advantage of this sort of paper White and Payne´s grey combimed with raw umber to trow out  first lines


2nd Step.- I start to build up background color texture combining watercolor painting with modeling paste.  as this is below final colors all my greens are combined with Payne´s grey, the thicknes is still minimal but will be my foundation for next texturing shapes


Continue to adding more texturing shapes
It is better to do it in several stages allowing each layer to dry before you apply the next in that way can be filled and sealed without any issue of cracking
 
 
3rd Step .- Now I can start to add lighter colors above mixed with modeling paste but added with spatula to conform many shapes, colors and brights accordingly


4th Step.- Define and re-define main lines and shadows to finally add now permanent White "gouache" to highlight right side illumination
 
 
 Finally - balance colors and hues and then cut the paper
Note some colors are absorbed by modeling paste wait for dry and reinforce if necessary
 
 
Ref 1039.- Watercolor & Pastel.- Over Stardream old gold color paper

These two media have very different surface characteristics, pastel is opaque and dense, while watercolor is thin and translucent, however they can be combined successfully to créate images of considerable depth and subtley, the watercolor is usually laid first, then overpainted with pastel.

These are the steps  of this particular process;

1st.- Watercolor lines


2nd.- Pastel strokes laid over the dried watercolor to build up texture;


lunes, 23 de mayo de 2016

Ref 1037 Watercolor over modeling paste on canvas


Main steps below the painting result of this process


1st step.- I cut a piece of canvas over cardboard "21x26 cm and taped a frame of 2 cm all around


2nd step.- I start to sketch the main form with a pen (it is better to use a pen instead a pencil, in order to be able to see main features once molding paste be applied above )


´The main features are now completed in pen, above the canvas


3rd Step, What you need now is molding paste, and old flat brush and spatulas several sizes
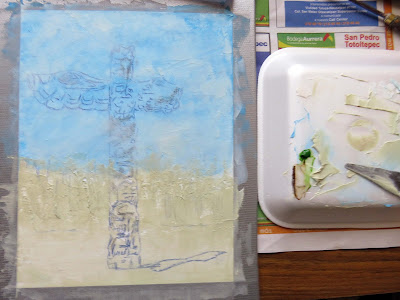
I start with background so I mix cerulean blue with modeling paste and apply with a spatula, as you can see the small thickness let us see the tótem lines underneath Note .- when apply you can add just simple modeling paste "White color" to make different tones as in the sky (clouds) once completed apply additional wáter with your fingers to make a smooth surface


Folowing the background now I mixed a dab of Green and raw umber with modeling paste for this área I do not add additional wáter instead I´m making texture with the spatula for the far tres


4th step.- Into the tótem área I start to build up more thickness with modeling paste + raw umber + a dab of burnt umber, trying to follow the different contourns with a small spatula


As I´m trying to build up more thickness the feature main lines are not so easily visibles into the tótem

 
5th step.- So I have the chance to redefine the features over it, I did use this time Brown gel ink and build up again more modeling paste as it dries, reinforcing the lines


Once completely dry this will be my underpainting to work with
 
 
6st Step.- Now with watercoloring and brush start to define main shadows and from there ligth color details
 
 
Through all the stages you can add more modeling paste to sculpt the figure as much as you want - to give the 3D appearance and paint again over it
 
 
This is the result  after taking the masking tape off,
 
 
And the painting itself
hope you like this sculp-painting art method
 
 
Ref 1036 Gouache & watercolor pencil over Stardream bronze color paper

Trying to get something different I did a new experiment over this sort of colored paper this time I added gouache over the paper as underpainting from where I can trow some defined pencil lines above more easily so I did use for this purpose watercolor pencil to check on results

This paper is metalized and is not easy to watercolor over it, but gouache  (opaque watercolor painting works better) therefore I did use as  my underpainting - in other words the base to add transparent watercolor over it, - in the painting you can see those pencil lines however didn´t work at all so I´ll be trying a new approaches with this type of paper to take advantage of the metalized dark color of it;  in  future new experiments


                                    " The girl behind the hair"

miércoles, 18 de mayo de 2016

Ref 1035 Watercolor // Watercolor over modeling paste on canvas

This medium is used to build up textural and three-dimensional effects. It’s perfect for giving a raised effect to subjects such as flower petals, stone walls, and buildings. Apply it on the surface with a spatula, let dry, and paint over it with watercolor — paint will adhere well to the surface. You can also make an imprint into the paste or scratch into it before it dries completely in order to create desired textures. This fine paste has a creamy consistency and I tinted with tube watercolor to build up this painting taking advantage of its transparent properties to work on model skin
I like to experiment with modeling paste so I added an underlying texture with some  watercolour as under-base for this painting
This is the result of this particular process;


Step 1.- Canvas cut and masking taped
              Draw the composition
              Material needed through out initial activities are;
                                         molding fine paste
                                         Spatulas several sizes
                                         Fan brush and flat brush (wear) for texture zones


Step 2.- It is better to start covering from background to foreground with modeling paste, but I did a change doing from foreground to background in order to do twice at the foreground to build up more thickness and then more 3D relieve, modeling paste is regarding its thichness in some way transparent so you can follow the sketching lines below
Modeling paste for this particular Project was first tinted with watercolor and added with a Little spatula over the model body regarding shadows on it to work later on as the color base
Do not worry if you overpass some lines in some way it is better for integration purposes


This is how it looks after model completation, as you can see sketching lines are still visible underneath at the end of this application the molding paste applied I added wáter with my fingers over it to smooth its surface


Step 3.- After wait a liitle bit to dry you can start working in the middle ground "the granite Stone" in which I need to texturize accordingly first adding the tinted modeling paste with the flat brush and usingg here and there the fan brush  (color should be the darkers ones because they´ll be working as the shadows as for the reference)

 
4th Step.- Now the background wich is the darker one (do not use black to avoid 2D look ) and take advantage to redifine model figure
 
 
5th Step.- Now in order to build up more relieve I´m adding more modeling paste in the Stone with a tinted médium shadowing color over it with additional texture as I´ll be adding it also when I start to work above the model figure the darker original color still is transparent for the following layers  giving rich colors at the end .- Now this is my underpainting


6st Step.- with watercoloring and fine brushes  I redefine the figure from dark to ligth and take away the masking tape leaving the original color of the canvas as the frame --- This is the result a relieved 3D painting in watercolor over canvas


This is the final painting without the frame .- results are really ineresting by all colors you can get with those transparencies added through out the whole process


jueves, 12 de mayo de 2016

Ref 1031.- Watercolor //  Watercolor over Stardream Citrino color paper

Experimental process now with gel ink pen, and watercolor pencil as the sketching initial lines

This is te result of this process:


This time I was not sure in how to take advantage of the sketching initial lines, I had two ideas to start with either with watercolor pencil and/or with gel ink pen, both of this media dissolve with wáter but I wanted to left some of this lines suggesting painting main features
This colored paper is light blue, so I start by sketching with watercolor pencil rubbing from time to time with my fingers to indicate main shadows


As this is an experimental technique I tried also black gel ink pen to reinforce some lines at the bridge  basically, I also added watercolor White to check its influence but it does not work at all at this time.


So I added White gouache and as this dissolve also dissolve the sketching lines so you need to be selective in wáter amount by the way the darker tones came from the black gel ink working in some way better with this paper all buildings were made with pencil watercolor and stained a Little bit


Now with Payne´s grey watercolor and a fine round brush I reinforced the bridge features  and I apply a Little bit of médium yellow watercolor  so the palette through all this painting is just Payne´s grey, médium yellow and permanet White to highlight everything needed


Finally to complete the painting was added White gouache with minimal dissolution to suggest lights over the bridge and fine lines with payne´s grey for additional details


Base on this experimental painting I´ll be using ink gel to sketch some following projects  to work with this paper

martes, 10 de mayo de 2016

Ref 1030.- Watercolor // Watercolor over Stardream dolomite color paper 105 Lb

This is another exercise, with this sort of paper, "dolomite color" is basically bright litmus
and like I said in previous projects works quite similar to hot press paper

This is the result of this particular process:


My reference is a photography found at internet, but as this is my first exercise with litmus color, I start with the darker colors at the bottom and from there start to work in the high mountain  and before start with details I tested the colors I wanted over this paper to check values
I use to make my greens rather than take it from the watercolor tubes, however this time I didn´t so the greens at the bottom are a combination of Thalo Green, sap Green and Green bladder, combined with ultramarine blue and Van Dyke Brown, playing with a brush a tree vertical perspective; Mountain blues are; prussian blue, thalo blue and ultramarine blue, rocks are defined with Van  dyke Brown, sky a Little bit of med yellow and some above in the mountain everything above this colored paper


Once I felt satisfied with watercolor values, I start by define all shadows and forms


Above this type of paper it is quite easy make corrections adding wáter and cleaning with an aborbent paper, or use that paper to integrate new lines according color values


Final step .- Snow brigths are ( permanent white of gouache) which is opaque and brigth added with a little spatula following mountain light and angles  and again I reinforce some darks colors to contrast the whole scene